Things to do list

  • Workshop Tips
  • Bread Rolls
  • Gourd Crafts
  • More Toys

Counter

Thursday, 17 November 2011

I'm all stuck up...

...Ah, ha, ah ha! <--looks nothing like how I said it!

Okay, shoppers, I've been away from frugal, cyber space for a while so thought I would get back into the swing of things by sharing some of those useless tips that change your outlook on life forever!

I use tubes of those 'liquid nails'(TM)-type stuff
.

You find them at your local hardware shop
in convenient sizes like more than enough to stick a 20 tonne truck back together or nearly enough to reattach false eyelashes.

Invariably, this means you buy the size to do the job and hope you don't have too much left over.

Well, for those of us who do have too much left over, here are a couple of things you may want to try using the glue for.

For those who have never used liquid nail/no more nails or whatever TM names it goes under, it is a special glue in a cartridge and it dries as hard as, erm, nails!

So. When you have finished glue nailing your plasterboard to the bathroom ceiling or whatever, what sort of things can you do with the leftovers?

How about making Doc's knobs of all sizes to suit your knob requirement (sounds rude)?

Waddleyaneed:
Big tube/cartridge of leftover Liquid Nails (TM)
Clicky thing to squish said leftover glue -you know what I mean - you have to buy a new one each time because you never remember where you put the old one. I have six at the moment!
Bottle lids of many sizes
Bolts of many sizes to suit your needs
Wooden clothes pegs

Step 1
Get all the stuff together so you can take a neat photo and give people a better idea of what the hell you are on about.

Note the blue clicky thing with the glue cartridge in it.


Step 2
Grab a lid and fill it with the liquid nails glue stuff from your clicky thingy and whack in a bolt.

Step 3
Repeat step 2 as required and whack in another bolt, held securely(ish) with a wooden peg if it won't stand up by itself.


Step 4
When completed, allow to dry (a few days to get hard - fwaar!) then stand back and reflect the important question of life...Why did I do this?


I have arthritic hands (seriously!) and have used these knobs as an aid to help me unscrew bolts from some of my woodwork machines - lathe, drill press, scroll saw and the like.

They dry hard (the glue not my hands) and I find they are easier to grip.


You may think of a multiple of uses for these knobs eg drawers knobs.

If you can think of more than five uses, you probable need to get out more!

Okay.

We still have not used up all our glue (who'd have thunk it). So what else can we do?

How about a great, easy-to-make, Doc's storage container for all those nice, easy-to-handle knobs you made.

Waddleyaneed:
A DVD/CD pack thingy
Hacksaw/sharp knife/good teeth
Some more of that hard as nails glue stuff
The clicky thing that squirts the glue out
Room under a shelf

Step 1
Grab your CD/DVD pack and take apart thusly:


Step 2
Cut the sticking out bit off with the implement of your choice.


Step 3
Under the shelf where you are going to attach the container, apply a couple of dobs of the glue from the clicky thing and stick the base to the underneath of the shelf.


Step 4
Allow to dry - the glue not you -(it wasn't that much hard work) and when dry attach the other part of the CD/DVD pack and fill with useful items such as the knobs we made previously.

Note how the dust already in situ under the shelf remains in place.

Obviously the cleaner had not been into my workshop immediately prior to me taking the photo.


Step 5
Ponder the logic of now having a single container permanently stuck to an area under a shelf that you can not actually get to with ease!

Oh well, somebody might find it a useful tip.


Anyhoo, got to get back to making more toys before I run out of the hard-as-nails stuff.

Doc ;-)

Friday, 3 June 2011

Thank you blogger:

I would just like to thank Blogger and all those associated with it for somehow losing all the comments on my posts.

You people don't happen to work for the Australian government do you. They seem to be about as competent with the interwebs as you guys!

How am I supposed to remember which jokes I used razz

Now I have to go back to the real world and play.

Thanks to all my followers for following. I will post something less melodramatic when I can.

Doc wink

Apparently light travels faster than sound - this explains why some people appear bright until they open their mouth.


.

Monday, 17 January 2011

More, more more...

How do you like it?

Hi all.


Have been unwell so thought that whilst I'm still alive instead of blah-ing on <---new word there, I reckon, I would post some more piccies of some toys I made for sale and/or the grand-twins.
sad

All made from scraps. Enjoy.


First a legal warning:
Please be careful looking at these toys.


Some of the pictures have sharp corners.


Some of them contain parts that could be swallowed by a child. Especially if that child has a mouth capable of pigging out on something the size of its own head.

Bear this in mind if you copy any of the designs.


They also are finished in a child safe oil which can cause injury when the 5 litre can containing the oil is bumped with a bare foot.

Do not ask me how I know this.
cool

No electrons were harmed in the posting of these pictures and only stunt cats were used and no harm was done to them. Much. Well, maybe a little bit but accidents happen. biggrin

A special family by request.


Another special family living in a 300mm tall house with no stairs! cool


It's a pair of rattles I made for the you-know-whos. Ninja the nosey cat doing what she does best - bugger all but get in the way (anybody want a cat). biggrin


Another wheeled vehicle about 200mm long. No. Wheely, it is. biggrin


The goddess calls this the roadster, I think. Or maybe it was rooster. Also about 200mm long. The roadster/rooster not the goddess. eek


My first noisy pair of toys for the grand-twins. The balls make an irritating ping-ponging noise bouncing around inside their 'cage'.

Grandparenting is all about revenge.
razz


Drumming up some business for when the twins get older.


Lots of wheels on this dude and is almost half a metre long. Maybe I should just say it is wheely long. Sure get tyred making wheels. biggrin

Should keep the punsters happy for a while.

Doc wink

BTW
Happy New Year eek

Tuesday, 12 October 2010

Wicked Wicking Beds for the witless

Scarecrow (AKA the goddess - think: adore, worship, love, pedestal - you get my drift) suggested that I might like to do a tutorial on making wicked wicking beds so here it is.

Wadjaneed
Some stuff for the sides
Some other stuff for the ends
More stuff to join them all together - lots of stuff at my place!
biggrin
Some plastic to line the bottom of the bed(s) with
(or you could just use an old freezer or other suitable receptacle that would hold soil and worms)
Some 2" slotted agricultural drainage pipe to get water into the bed
Some soil and stuff (see Scarecrow for more details)
Worms - not those of a personal nature, but the ones you grow in your worm farm. Everybody has a worm farm, don't they?
A spirit level <---betcha never thought I had one of them!
Sand or fine loamy soil
Mulch to cover the bed when you have finished

First of all, some points about wicking beds, so listen up.

1 Wicking beds are useful in an environment that does not have much rainfall. If you get plenty of rain and water is not an issue then maybe you should simply look at having raised garden beds.
We are not that far from a desert.

2 Wicking beds allow water to get to the area the plant needs (the roots, so the goddess informs me) by, you guessed it, WICKING!
biggrin

Think of an oil lamp with a wick in the container that moves the fluid from the bottom of the container (the wicking bed) through the wick (the soil) to make the flame (or plant) at the top grow <--see what I did there. I believe the process is called capillary action, go look it up somewhere if you want.

3 The concept and application is as easy as it looks. Do not overthink the idea or you will never get the job done.


4 The total soil depth is about 300mm and water is poured into the pipe until the pipe sounds full then the water will 'wick' up into the surrounding soil. It is 'normal' for the topsoil to feel dry, since it is. The moisture is at the roots where it is needed.

If you don't believe me, ask Scarecrow. She knows these things.
mrgreen

5 Any excess water (yeah, right) in the bed will simply leak out over the 100-150mm plastic layer at the bottom. If you are using an old freezer drill a drain hole 100-150mm from the bottom of the unit to allow drainage.

6 If your bed seems to be constantly wet (and you have sought medical advice!), re-read point 1 a bit more slowly.

7 Be nice to your critter helpers in the garden


In the example within the goddess' garden, I have used some old galv iron that was lying around (actually, it was neatly stacked in my storage area within the garden, but you get the picture) and some scrap 4X4 timber supports from a friends veranda that blew down during a nasty storm.

You use whatever you have around or go steal from a neighbour.

Step 1
Cut everything to size. Use whatever you have (this is a frugal site, after all) but try to limit the width to something you can comfortably reach over from one side to the other without needing medical treatment later.

You can see several in the process of being made, here. The goddess thought I looked too quiet and happy in my workshop.
biggrin


Step 2
Join the cut pieces together using whatever is available.


Step 3
With help from your lovely, though a little bossy (!!), assistant, carry the bed(s) to their final destination.

Check for roominess, right way around-ness, knee-banging-ness, whether or not your barrow fits between-ness etc etc


Ensure management approves of the process. I do not like cats.
cool

Step 4
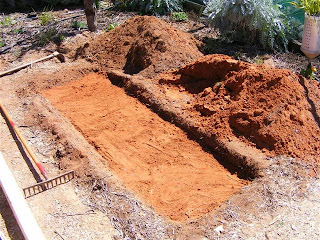
Find a willing volunteer and start the process of levelling the ground under where you are going to place your wicking bed(s). This is a very important part because the site must be level for water to move properly through the bed.


Step 5
Carefully line the base of the bed with your plastic and smooth it to fit (without tearing). This can be trimmed to allow a depth of approximately 100-150mm.

You can place a little sand around the bottom of the plastic to hold it in place whilst you smooth and cut it.

Check the levels of the bed again.


Step 6
Measure, cut and lay your 2" ag drainage pipe (or equivalent) along the bottom of the bed and carefully cover with sand.

Keep checking your levels, this is important. One end of the pipe will be bent 90* and run up the end of the bed to allow you to pour the water in whilst the other end is blocked off.


Step 7
Once the pipe is covered, you are ready to start putting in some nice soil, complete with worms to bring the bed up further ready to plant into.

In the bottom of the piccy you can also see where the water will be poured in.


Step 8
Get out of the way as Scarecrow pushes her way through to plant some spuds in this particular bed.

These were planted, covered with soil and then covered in a layer of mulch.
cool


Extras
Because I think the spuds are a little shy, Scarecrow fitted the bed with net curtains so they could have a little privacy whilst they do the growing thing.
rolleyes


Either that or it offered some protection from the plague of locusts that are expected within our area any time soon.

Yeah, that would be the reason, probably.
lol

If you want to grow something up a trellis you can carefully place an appropriate trellis within the bed thusly and lay a couple of bits of wood across the base of said trellis to prevent it blowing over.

Clever, hey!

Fill with your nice soil mix but be careful not to upset your levels.


Make sure it looks tidy, too.

Voila.


Righty ho, any questions, you know how to get hold of me.

A couple of caveats (sounds like a foreign dish), though.

I can tell you all about building the beds but the goddess is the one to ask about what to grow and when. It's her job to grow the stuff, my job is to just cook it so don't ask me if now is a good time to plant <insert stuff here> or not.

Anyhoo, til next time, I'm off to hide.

Love, peace and mung beans.

Doc
wink