Feed the birds...
...tuppence a bag - yeah, I'm sure Mary Poppins fans will be crying into their soup about now. ![]()
Anyhoo, here are a couple of cheap and easy(ish) feeders/troughs for your feathered friends - chooks/chicks/chickens/fowl <--just helping out search engines.
They are made from stuff that I had lying around but I am sure you could probably rustle up some similar stuff or else steal it from somewhere. ![]()
The goddess (Scarecrow) requested that I make our chooks something nice to eat out of.
Obviously I just never look busy enough.
Being the dutiful 'henpecked' hubby (not really, but thought I could squeeze in a chook joke) this is what I came up with.
Wadjaneed
Some PVC pipe of some diameter or other about the length you need
Some wood for the ends
Hammer or mallet for, erm, hammering or malletting(?) ![]()
A drill or drill press <---Legal Warning: Fast, sharp thingy
A saw for, erm, sawing <---Another legal warning: Fast(ish) sharp, thingy that bites
Some gadget for making big round holes in wood (also called hole saws)
About half an hour (but you can drag it out if you need to impress)
Some chooks to try it out on - the feeder not the hole saw
This piccy shows the gear needed to make two feeders/troughs.
Step 1
Using your hole saw, cut about a third into the wood to make a shallow, groovy circle in your wood.
Step 2
Carefully measure (yeah, right) to cut the circle in half on each piece of wood.
Please note, this piccy was staged. I've never used a measuring implement to do this in real life.
Step 3
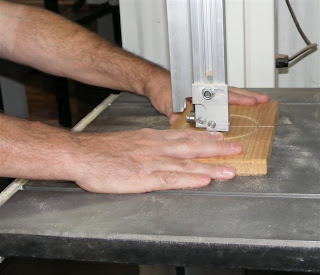
Cut circles in half, carefully <---watch out for pinkies. ![]()

Step 4
Take time to admire your handiwork and wonder how much longer you can look busy before you're sprung for another task.
Step 5
You now have two ends for each trough almost ready to rock and roll.
Step 6
Cut the PVC pipe down the middle (don't forget the sharp, fast thingy warning). This can be done with a hand saw if you do not have a bandsaw.
Step 7
Become awed at your greatness as you stare at the collection of bits that you have now made. ![]()
Step 8
With your hammering device, knock the wooden ends onto the end of the PVC pipe. If it doesn't fit, you can carefully sand or file the edge of the pipe to get it into the groove.
Repeat this for all ends.
Watch your pinkies - mallets hurt - don't ask me how I know this. ![]()
Step 9
Bung the end product on the concrete so you can show everybody the completed project.
Step 10
Bask in the praise of the goddess and allow her to make a fuss of you. Sorry. You are not getting any pictures of that. ![]()
![]()
Well, there's another ten step program for you to try.
Break a leg <----Wonder if you can say that in the States or will somebody sue you ![]()
Peace.
Doc ![]()


No comments:
Post a Comment