Things to do list

  • Workshop Tips
  • Bread Rolls
  • Gourd Crafts
  • More Toys

Counter

Wednesday 28 March 2007

Nifty Knotted Netting

Nifty Knotted Netting
Whatjaneed
4 Star Pickets
A tree needing protection from critters (ours is a cherry tree)
2” agricultural pipe
Netting

Step 1
Wack in the pickets around the tree.

Step 2
Cut the pipe to size with a hacksaw to cover the tree. 2" pipe will cope with a 2.5 metre span easily.


Step 3
Slide pipe over the pickets


Now is a good time to prune the tree to fit.


Step 4
Attach netting over the pipes.


Step 5
Make sure it actually seals or birds will find a way in.


Pullalong Toy

Pull along croc
Whatjaneed:
Some scrap pine to draw a crocodile on
4 wheels about 35mm (1¼”)
Dowel for axles (8mm or 5/16”)
Skinny dowel for segment joins (6.5mm or ¼”)
Dowel or whatever for a handle
Some cord about 90mm long


Some tools:


Step 1
Draw your shape onto the wood and mark where the wheel axles will go.


Step 2
Check that the wheels will get the body off the ground and drill axle holes.


Step 3
Cut out the shape as one piece. Sand the body and take special care with the edges.

Step 4
Check to see that the holes will line up at the joints.


Step 5
Drill holes for the segment joints.

Step 6
Using your fretsaw, cut the notches for each section.


Step 7
Sand the notches to ensure the croc has a decent turning circle and that each piece can move freely.

Step 8
Dry assemble to check fit and trim axles to fit.


Step 9
Disassemble and finish with paint, varnish, oil or whatever you chose. I tend to use Danish oil as it is easily wiped on, allowed to dry for a few minutes then wiped off and repeated ad nauseum 8-)

Step 10
Drill a hole in the nose and handle dowel and thread some cord through and away your child goes, being chased by a friendly crocodile.

Friday 23 March 2007

A Triangle Thingy

Another easy garden aide I made for Scarecrow.

Take a piece of plywood and cut an equilateral triangle with sides about 400mm long. If you can’t cut an equilateral triangle, just make one with all three sides the same size 8-)


Use an old file handle and attach by screwing from underneath the triangle


At about 50mm intervals notch the wood.

These provide rough measurements to guide the user to space seeds prior to planting.

For a long row simply roll the triangle like a wheel to get your spacing.

The plywood doesn’t need to be painted or finished unless you choose to but I wouldn’t leave it out in the weather for prolonged periods.

Try not to get too bogged down, this is a 10 minute job.

Wednesday 21 March 2007

Frugal garden aides

Here’s some simple and easy to make garden aides that I have made for Scarecrow over the years.

Firstly, the seed planter.

Take a bit of electrical conduit (it’s always lying around here coz I use it for all sorts of stuff).


Cut to about chest height of the person wanting it.

Make one end pointy by cutting two sides thus:


Stick it in the soil (Scarecrow told me that’s what it’s called, not dirt).


Plop your seed down the spout…


…and there ‘tis. No bending or anything.


Fella’s, you have to make one of these for your babe…chicks love ‘em 8-)

Next, the tap turner thingy (pardon the technical talk).

For those who haven’t met my loved one, Scarecrow, you can check out the typical garden layout we have and can probably appreciate that there are many taps in the huge dripper system that supplies water to the garden.


To make her life easier (come on, guys, this is always a winner) I made this for her.

Take a bit of electrical conduit. I could have copied and pasted this 8-(

Cut to about chest height of the person wanting it. I did copy and paste this 8-)

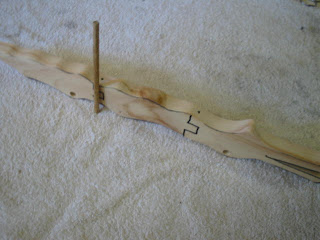
At one end cut slots so that the end fits over your tap.


At t’other end drill a hole and wack some dowel through it to make a handle.


Wacko, easy, no bending, tap-turning thingo.

This is also cool for people who have arthritis. Simply cut to an appropriate length and make your slots wide enough to fit over and ordinary tap (indoors or outdoors).

There ya go.

Tuesday 20 March 2007

Doc's Apricot Oatbran Muffins

Whatjaneed: 
250g SR Flour
1 teaspoon Baking Powder
45g Oat Bran
60g Dried Apricots Chopped
60g Sultanas
1 egg beaten lightly
325ml Skim Milk
60ml Golden Syrup
90g Butter Melted


Sift flour and baking powder together.

Add oat bran, apricots and sultanas and mix to combine.

Melt butter and golden syrup in a pan

In a jug combine egg milk.

Add milk and butter mixtures to dry ingredients and mix until just combined. Do not over mix.


Spoon into 12 half cup muffin tins and bake for 15-20 mins at 180c or until cooked when tested with a skewer.

Remove from tray and cool on wire rack

These muffins can be frozen in a zip lock bag.

Doc's Choc-Rough Muffins

Whatjaneed: 
125g butter, softened
125g sugar
2 eggs beaten lightly
250g SR Flour sifted
30g cocoa powder sifted
155g chocolate chips
45g coconut
185ml skim milk


Beat butter and sugar together in a bowl with electric beaters

Gradually beat in eggs

Sift flour and cocoa powder together then add to the butter mixture along with the coconut, chocolate chips and milk


Stir together until just combined


Spoon into 12 half cup muffin trays and bake for 35 minutes at 180 c. until muffins are cooked.


Remove from tray and cool on wire rack.

I often make them at the same time as my apricot oatbran muffins to cut down on oven energy.


These freeze well 8-)

Doc’s Easiest Lasagne in the world!

Whatjaneed:
Lasagne Pasta (see my pasta recipe here)
White sauce (to follow)
About 500g Mincemeat

First make this pasta or you can use dried bought sheets
Then make Doc’s Easiest Bolognaise in the world recipe.
Then make the white sauce:

Doc’s microwaveable white sauce for Lasagne
NB: If you don’t use a microwave you can do it in a saucepan on the stove.

I have never done that so can't advise - maybe I should call this Doc’s microwaveable white sauce for people who are just soooo lazy 8-)

Anyway,
3 cups milk
3 heaped tablespoons cornflour
1 Cup of grated cheese


Whisk milk and cornflour in a microwaveable jug.

Microwave for 3 minutes on high.

Stir.

Microwave for 2 minutes on high or until thick

Add the cheese and stir


Put it aside until we need it

Now, the lasagne...

Grab your lasagne sheets..


...boil some water until it bubbles and add your pasta sheets.

If using fresh pasta be aware that it doesn't take long to cook, maybe about 5 minutes compared to dry stuff.


When al dente place some of them in your lasagne dish and put some of the bog over it


Cover this layer with an amount of the white sauce made earlier.


Then add another layer of pasta, bog and white sauce and another.

After finishing covering the final layer with white sauce, sprinkle a handful of your favourite grated cheese and sprinkle some grated parmesan cheese.


Wack it in the oven at 180 c for about 40 minutes.


At this stage, I usually allow it to cool and put it in the fridge overnight and cut it the next day.

Of course, you could always cut it fresh and eat it straight away 8-)

This freezes really well. I don't know how long it lasts in the freezer because it is usually eaten within a couple of weeks.

Scarecrow really likes it ;-)

Enjoy, Doc ;-)

Doc’s easiest bolognaise in the world!

Serves 4-6

Take one jar of Doc’s home made pasta sauce (see elsewhere for recipe)
1 tray/lump of mincemeat (about 500g) (if you are a vegetarian you can use TVP or grate up some zucchini, carrots and potato)
Small chopped onion
Some oil


Pour oil into frying pan.
Add onion (this is to take away the aroma of the mince cooking).


When soft add meat. Stir until meat is cooked.


Add pasta sauce and stir.


You are now only heating this up since the sauce is already cooked.

Eat 8-) …any leftovers freeze well and make a nice snack on toast or on a baked spud.

Monday 19 March 2007

Frugal Potting Mix

Whatjaneed:
Loam
Potting mix
Seasol solution
Rain water
Cocoa Peat brick
***Mask for use with potting mix whilst mixing***
Wheelbarrow


Potting mix mixer – can also be used to mix concrete 8-)


Step 1:
Fill a bucket with rain water and put in a peat block. Add a capful of Seasol. Allow to soak until all the water is absorbed.


Step 2:
Wearing a mask, empty the potting mix into the mixer (or wheelbarrow if you haven’t got one) and switch on. Whilst it’s spinning add the loam and peat block mix. You may need to add slightly more water to keep the mix damp ie prevent you breathing in dust.


At this stage you may wish to add any water storage crystals – the type that help stop your pots from drying out.

Step 3:
Empty the mix into a wheelbarrow.


Step 4:
Use it to plant your seeds or seedlings into.

Scarecrow uses pots sometimes but also plants seeds directly into toilet roll holders.

Nothing wasted here 8-)