Things to do list

  • Workshop Tips
  • Bread Rolls
  • Gourd Crafts
  • More Toys

Counter

Tuesday 24 April 2007

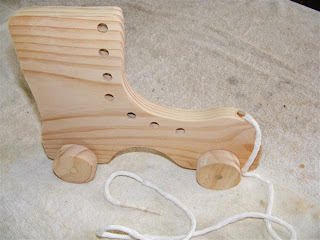
Pull Along Boot

Pull Along Threadable Boot

Whatjaneed:

Scrap 19mm Pine
Wheels
Dowel for axles
Sandpaper
Cord
Finish

Step 1
Draw your boot or trace around a template.


Step 2
Cut out the shape and sand smooth. Create wheels and sand well.


I find threading wheels onto a bolt and sticking them in my drill works well.


Step 3
Drill lace holes and axle holes. Dry fit the boot to ensure everything works.


Step 4
Drill a hole to attach your cord and fill it with wood glue.

Plug the cord and a piece of dowel into the hole.


Step 5
Take the other end of the cord and soak about 25mm in some wood glue and ‘tease’ the end to form a stiff end as the glue dries. 


This acts as a tow rope to pull the boot along as well as the 'needle' 
with which to thread through the holes. 

Great for fine motor skills.

Saturday 21 April 2007

Lap Table

Nifty Bed Table


A while back Scarecrow was quite ill and I had to look after her.

I didn’t mind but as she was bedridden for a while I had to make a table so she could sit up and use the laptop or lean on whilst waiting for me to feed her.

The top is scrap 6mm Chipboard approximately 700mm by 400mm.

The legs are made from 55mm square pine offcuts (I always hang on to scraps).

The angle of the legs was determined by eye.

I looked to see if I thought the table would fit over Scarecrow’s legs in the sitting position.


Cut the legs to length and sand smooth.

Cut the top to size and sand smooth.

Screw and glue the screws into the legs from the top and paint.


At the time all I had in stock was black paint, hence the gothic look!

This all had to happen in a hurry so I wasn’t interested in finesse, however it could easily be made with more care and time and be ‘decoupaged’, or have a nicer colour applied, or even have a nice beading around the edges. It’s up to you.

I will be turning this into a router table shortly, anyway.

BB Fruit Cake

A Boiled Bake Fruit Cake
This is Scarecrow’s recipe for a boiled baked fruit cake.

She has allowed me to use it because
she wants me to make one for her!

I like it because it actually makes 3 loaf tinfuls (if that makes sense) and I like to cut them in half and freeze them since there’s only the two of us here now. They freeze well.

Whatjaneed:
240g butter
2 cups water
2 cups sugar
2 teaspoons mixed spices
2 teaspoons bicarbonate of soda
500g mixed dried fruit (I used dried cherries, peaches, apples and apricots from the garden)

Boil all the stuff in a large pot.


Don’t be fooled by the seemingly small quantity because the carb soda will cause the mixture to rise considerably seen here:


When cool (the mixture, not you) add mixed up in a bowl:
4 eggs (handy if you have your own chooks)
2 cups sifted self raising flour
2 cups sifted plain flour

Mix all together, pour into lined tins and cook for 1 to 1½ hours at 160c.


When they have cooled you can cut off slices and butter then and eat with a nice cup of tea or coffee.


Enjoy ;-)

Wednesday 18 April 2007

El-Cheapo Camera Stand

The El-Cheapo Camera stand

Whilst I am the former IT professional, Scarecrow is the digital photographer.

Because she does a lot of close-up work I decided to make some cheap glass and plastic bottle-based camera stands for her so that the images are really steady when using macro mode.

Whatjaneed:
A flagon or juice bottle with lids
1/4“ threaded bolts (standard camera tripod thread)
Washers
Nuts


Step 1
Select your bottle lid and drill a hole in it.

Step 2
Thread a nut onto your bolt and cut the bolt to size. Unthread the nut and it will clean the end of the bolt to allow a perfect fit into the camera.


Step 3
Insert bolt through a washer and tighten nut.


Step 4
Attach camera to the lid.


Step 5
Meanwhile, fill up your container with a suitable ballast. Note how I have allowed myself a moment of creativity LOL.


Step 6
Screw the lid/camera onto the container and proceed to take heaps of pictures without worrying about the camera not being held perfectly still. Don't worry about stability. This is a very heavy container/ballast combination.


You can continue to make up several from various bottles and sizes according to your photographic needs.

I'm currently working on a pan/tilt design but Scarecrow hasn't asked for one of them...yet 8-)

Sunday 15 April 2007

Easy Breads

This is one of many recipes I hope to share with those of you who have a breadmaker. You see, I am a gadget junkie and I have made breads by hand but being as lazy as I am, I love using my breadmaker.

If your breadmaker has a dough setting then, over time, be prepared to make some delicious rolls, loaves and dampers.

First, though, a warning:

Most of my recipes use 3 cups of flour or solids to 400mls fluid.

Check the ratios for your machine.

For some reason here in the mid-north of South Australia (some of you none-Australians will have heard this referred to as ‘Heaven’ in various religious texts) the fluid amount is often a lot more than the book that comes with the machine. Adjust it for wherever you are.

Basic White Loaf
400mls Milk
3 Cups Bread making Flour (English people, I think it is called Strong Flour) – has flour, sugar, improver and salt in the right quantities
1 to 1½ teaspoons yeast
1 tablespoon olive oil

Bung it all into the breadmaker in the order that your machine manufacturer recommends.

Set it to Dough cycle.

When complete, empty out and punch down and let rise a second time.


Cut into small rolls and place on oiled trays or place into a loaf tin or 2.

Cook at about 200c for about 20 to 30 minutes until cooked.


Parsley and Parmesan Wholemeal Loaf
430mls Water
3½ Cups Wholemeal Bread mix
1½ teaspoon Dijon mustard (or your favourite)
½ Cup chopped parsley
3 Tablespoon Parmesan Cheese
2 teaspoon yeast

Bung it all into the breadmaker in the order that your machine manufacturer recommends.

Set it to Dough cycle.

When complete, cut into roll size and allow it to rise on oiled trays.

Cook in the oven 200c for about 20 minutes.


Delicious to have with our home-made cuppa soups 8-)

Enjoy, Doc ;-)


Lemon Chocolate Cheesecake

Delicious Lemon Chocolate Cheesecake

Serves 1 really greedy person or lots of people who are trying to be polite and insist on only having a small piece 8-)

This is a very impressive dish as it only takes 10 minutes from beginning to end (ie when you wait for it to solidify).

Whatjaneed:
Crust:
125g melted butter
2 Cups crushed biscuits (I used some ‘leftover’ ANZAC Cookies)

Pour the melted butter over the crushed biccies and mix well.

Being a gadget lover I do mine in a food processor. Doesn’t matter.


Flatten into a springform pan.

Use a bottle or whatever to get the mix right up to the edges. Or a hamburger squishey thingy if you have one.


Bung it in the fridge whilst you continue to make the filling.

Filling:
250g Cream Cheese at room temperature unless you are in the middle of a heatwave!!!
395g Sweetened Condensed Milk (a small can or tetra-pak)
½ Cup Lemon Juice

Bung it all in a mixing bowl and buzz it up with an electric hand mixer for about 5 minutes.

It will stiffen a little. That’s OK.

The lemon juice reacts with the milk and thickens it.


That’s why there’s no gelatine in the recipe to thicken it.

Pour onto the base, add some grated Chocolate on top (preferably a not-so-sweet one) and put in the fridge for an hour or so, or if it’s an emergency (!!!) at least until you are happy with the stiffness of the cheesecake.


Take out of the fridge and carefully release the clasp and remove the side bit thingy.


Cut an impressive slice and serve with a nice cup of tea or coffee.

I don’t know how long this keeps. We nearly had it last a day and a half when the kids were home!!!

Enjoy ;-)

Sunday 8 April 2007

Compost Tumbler Etc

This isn’t a step-by-step because I did these many years ago (pre-blogger). Just a couple of things that you can use your old 44 gallon drum.

The first use is as a heat sink under our fruit trees. They are placed where they will collect heat and filled with water. They collect the heat during the day and slowly release it at night.


The chook likes it too.

Another use is as a BBQ. Bivalve the drum, hinge the 2 sides together and attach a stay. Add a handle and drill some air holes in the bottom of the drum and make a grill for the cooking area. There you go…instant BBQ.

If the picture does not look much like a BBQ it is because I later got a bought unit and Scarecrow asked me if she could have it as her worm farm. Who could refuse such a great babe such a request?


Anyhoo, the drum is lined with shade cloth (stops the wormies falling out) and is half filled with a mixture of straw, coir block, shredded paper, old manure and compost.

To this is added various kitchen scraps. It is finally topped with a piece of felt to keep them worm er, warm as well as give them some privacy whilst they do their worm thing 8-)

This is an old compost tumbler I made.


Cut and hinge a door large enough to let compost fall out. Add a bolt to secure the door.


Drill a hole at each end of the drum and insert a steel bar and weld it to the drum. On one end weld a handle. Sink 2 posts in the ground and notch them so that the drum sits on top and can be turned every couple of days to mix your compost.


If you want to spend about 10 years as an apprentice, then you can also make a steel drum!

Bit beyond my frugal skills though LOL

Saturday 7 April 2007

Satay Chicken

Chicken Satay With Peanut Sauce
Serves about 4
1. ½ cup crunchy peanut butter
2. ¼ cup chicken stock
3. 2 tablespoons honey
4. 2 tablespoons soy sauce
5. ½ tablespoon Thai Red Curry Paste
6. 1 tablespoon lemon juice
7. 2 teaspoons curry powder
8. 2-3 chicken thighs or 2 chicken breasts
9. 1 can Coconut milk (400mls)

Mix 1 to 7 in a bowl.

Add chicken and refrigerate overnight.

Take out chook next morning (save the marinade) and cook for 10 minutes turning once to ensure thorough cooking.

Place the leftover marinade in a saucepan and add the coconut milk. Simmer until it thickens a bit. Takes a few minutes.

Cook up some rice and place it on a plate.

Top with the cooked chicken and drizzle the sauce over the top.


This is the ants pants of satays 8-)

It stores well in the freezer and I think we have managed to have some left in there for nearly 3 weeks!

Docs chicken, potato and spinach curry

Serves about fourish
We call it chipotspic, so it sounds more impressive, a bit like calling chips French fries

10 stalks silverbeet or spinach (I think you can buy it frozen. We grow it.)
1 chopped onion
2 large diced potatoes (approx 2 cm cubes)
1 cup chicken stock
1 cup homemade yogurt
2 Tablespoons Docs Madras curry paste (see recipe elsewhere) or a bought one
4 chicken fillets (thighs or breasts) chopped

Heat some oil in a pan.

Add onion, potato, chicken and paste and cook until brown and tender.

Add stock and coconut milk and bring to boil.

Add silverbeet/green stuff and simmer for about 15 minutes or until potato is cooked.

This stores in the freezer well. I am not sure for how long because it gets eaten within a fortnight

Enjoy ;-)

Doc's Madras Curry Paste

Whatjaneed:
Ground black pepper 2 tsp
Chilli powder 3 tsp
Cinnamon ½ tsp
Garam Masala 2 tsp
Tumeric 2 tsp
Coriander powder ½ cup
Mustard powder 2 tsp
Cumin powder 3 tsp
Crushed garlic 2 tsp
Crushed ginger 2 tsp
Oil 1/3 cup
Vinegar ½ cup

Mix all but the oil and vinegar in a bowl.

Stir in the vinegar to make a smooth paste.

Heat the oil in a saucepan and add the mix to it, stirring.

Allow to cool and put into a 400g glass jar (eg peanut butter jar).

Store in the fridge and use as required.

If it dries out as you use it, simply stir in more oil.

Enjoy 8-)

My Marinade

BBQ Marinade

Hey everyone, it’s a long weekend and amongst my many commitments I will be BBQing some chops I scored in barter with a local farmer who had serious computers problems. I fixed them up and he paid with a lamb all butchered nicely. I reckon his next major computer problem should be just before Christmas!

Anyway, Whatjaneed:
Your chops or steaks or whatever
Some peppercorns
2 cups of quality red wine. Fortunately all Australian wines are top quality. If you get stuck you can use a French wine 8-) One cup is for the marinade, the other is for you to show that you would not marinade your best meat in a wine you were not prepared to drink yourself LOL…sorry 8-(
A couple of splurges of olive oil
Some thyme
A couple of tablespoons of honey. Fortunately the local apiarist also had computer problems that I was able to fix 8-) I LOVE THE BARTER SYSTEM!!!
A chopped up onion

Bung it all in a ziplock bag and stick your chops into it and leave to marinate overnight.

Friday 6 April 2007

ANZAC Cookies

ANZAC Biscuits
These biscuits were originally sent to the Australia/New Zealand Army Corps in WW1 (the first war to end all wars before George Dubya Bush came along)

Whatjaneed:
1 cup rolled oats
1 cup sifted plain flour
1 cup of sugar
¾ cup coconut
125g butter
2 tablespoons golden syrup
½ teaspoon bicarbonate of soda
1 tablespoon of boiling water

Bung into a bowl the oats, flour, sugar and coconut.


In a saucepan, melt the butter and golden syrup.


Mix the soda with the boiling water and pour into the butter mix. It will fizz when added so don’t panic!


Add this to the dry ingredients and mix well with a spoon.


Put a teaspoonful of the mixture onto a well greased tray and allow for spreading.

Cook at 150c for about 20 minutes.


They will be soggy when they first come out but harden as they cool. That’s why they were sent to the soldiers on the front line in Turkey. When hard they lasted the journey from Australia to Turkey 8-) and so endeth the history lesson for today…8-)

These can probably be frozen but I have never seen them last that long in the biccy barrel.

Love, peace and mung beans

Doc ;-)

Wednesday 4 April 2007

Frugal Choccy Cake

This Choccy cake is frugal in as much as you don't have to go out and buy it to indulge yourself 8-)

I think buying cakes and biccies should be illegal LOL

Whatjaneed:
1 cup self raising flour
1 cup castor sugar
1 teaspoon vanilla essence
100g cocoa powder
100g butter
½ cup milk
2 eggs

Bung all the above in a mixing bowl and use an electric beater beat the whole lot for exactly 5 minutes!


Don't forget to clean the beaters!


Bake in a lined bar tin for 45 minutes at 200c and when cooked, immediately remove from tin and allow to cool on a rack (if you can!).


The oven was warm enough to allow me to bake some ANZAC biscuits as well.

I will put that recipe up shortly.

Don't forget to clean up!


Now you have made your cake you can ice it (I don’t) or leave it plain (I don’t) or slice along the length and spread with home made jam and whipped cream, like a sandwich (I do) and eat many slices (I do).


Scarecrow loves it.

Can’t tell you how long it lasts since it usually disappears within a day…must be the mice ;-)

Makes a really nice, good looking (and cheap) gift, too.