Things to do list

  • Workshop Tips
  • Bread Rolls
  • Gourd Crafts
  • More Toys

Counter

Monday, 21 September 2009

Why do you build me up, Buttercup baby...

...just to buy one of Doc's toy kits.

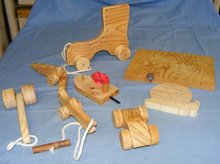
Getting ready for Christmas by trying out a few new ideas - cheap (read affordable) kit toys.

I have done this before but not in as much bulk as I do now.

The idea is that the kit contains the wheels, axles, shape and a mallet to allow an older child to make a toy (generally a vehicle) on their own or a younger child (say under four) with assistance from mum/dad/caregiver/lawyer etc etc.

Much of the gear is made up from scraps that I store away in the future projects-in-waiting (scraps) box.


Watjaneed
Wood for the main shape (duhh!)
eek
Dowel for axles
Thicker dowel for mallet
Wheels
Drill and bits for drilling (who would have thought)
Ziplock bags to put the parts into
Nice label

Cut the shape of the toy - tractor, bus, racing car etc etc

Cut out wheels accordingly, depending on what size you require eg the tractor will have two larger rear wheels and two smaller front wheels, the racing car may have four thicker wheels, and so on.

Sand smooth and round any edges.

You can finish with a Danish oil or not.

I like to leave the finish up to those who purchase the kits.

I usually suggest that young kids enjoy drawing with a felt pen or painting with water based paints.

Make the mallet by cutting a length of thick dowel for the hammering part - prolly has a name like 'head' or something.

Repeat this process to create a handle that fits into the 'head'. Glue these together.

Measure and cut your axles. Allow for a small overlap.

Put into your bag and add a nice label.

These sell at an affordable price so that even little Freddie/Sally can pick one up out of their pocket money budget.

On one side of my label I have a no-text pictorial on how to assemble the toy.

The first thing is to check the contents.


Then attach the two axles to two wheels.


Thread the wheels and axle through the predrilled holes in the vehicle...


...and knock in the remaining wheels.


I sell these at several galleries and markets (where I keep Scarecrow company whilst she sells produce and seedling thingys). wink

They sell well as the guilt sets in when the purchaser realises just how little quality time they spend together with their young ones. lol

Makes for a nice, cheap day out together.
rolleyes

Love, peace and mungbeans

Doc
wink

Thursday, 10 September 2009

Core..

...check this out

There I was in my toy/workshop looking busy (otherwise Scarecrow finds me things to do) when in walked a beautiful, long legged brunette (with a hint of grey) and sided up to me and whispered those three magic words...
eek


...soil core sampler.

Well, it did it for me.lol

Yep, Scarecrow wanted me to make her an auger for taking soil samples.

Bear in mind that this is made from stuff I have at hand, so do not get hung up on precise sizes.cool

Wadjaneed
Galvanised pipe (any length) mine was 550mm long (as per request), 25mm diameter threaded at one end to allow for the fitting of a...
Metal cap to fit
PVC pipe (I used electrical conduit) for inserting to act as a plunger
Wooden dowel to fit into the pvc pipe at one end
Long bolt and nut - acts as a handle when it comes to pulling the auger out.

Whatdja do
Cut the galv pipe to size leaving the thread on one end.


Cut the PVC pipe about 50mm longer.


Cut a 20-30mm length of dowel and stick it in one end of the pvc pipe.


Grind the end of the pipe to form a 'sharp' end. This makes it easier to enter the soil.


Drill a hole near the top, under the cap.

The end result:


To use, hold the pipe pointy end down and hit it with a mallet until you reach the required depth.

Using the bolt as a handle, twist the auger a little to allow ease of extracting it.

Undo the cap and push (carefully) the pvc plunger through the hole to put your sample on to your sample sheet - this can be a plastic sheet, a bivalved pvc pipe or whatever.

I gave this to Scarecrow and she said those other three magic words. wink

A real babe magnet, that auger.

Doc wink

Sunday, 6 September 2009

Roll out the barrel...

...Doc and the case of easy mixing.

One of the reasons I enjoy(ish) blogging is that I get to get piccies taken to show other people how to do stuff that I take for granted.
eek

This post is one of those things that I do...mixing small amounts of concrete or mortar.

The lovely Scarecrow asked me to put in a few posts for some extra fencing in one of the chook runs.

I must have looked like I needed something to do.
rolleyes

Wadjaneed
A small lidded drum - This is a spare similar to the cob oven wood storage drum.
A scoop or small bucket to carefully measure out your ingredients
Your ingredients - in this case, cement mix, sand and gravel
Watering can - nicked from Scarecrow, but it was for her I was doing all this (what a surprise)
cool

Anyhoo, I got the posts (we buy them in bulk) and dug the holes using a hole digger thingy.

You can use whatever you have - spade, shovel, demo bar etc etc.

I am assuming you have got to this stage without my help.
wink

On with the show.

First, put the dry mix into your bucket.
Maintain the correct ratio and look at filling the drum about 2/3rds full (or 1/3rd empty) to allow room for mixing. This is where you use your scoop. I am using a shovel coz I have done this a few times.

If you are unsure about the amounts, it is usually on the back of the cement mix..


Put the lid on tight.


Roll the drum to your site (as long as it is not that far away).
wink


Feet work, too.


All ready mixed now.


Pour into the hole.


Tamp down with a mallett or hammer and wooden block.


Pour water into hole using the stolen watering can.


Allow this to soak in and repeat the process until the amount of water is equivalent to the amount you would have chucked in if you were mixing this in a mixer or a wheelbarrow.


When I finished we put some mesh around to keep the chooks off - they are attracted to the water, and there is a reason there are no chooks at University.

Last thing I need is a chook laying a concrete egg.


This is a really easy way to mix small amounts of stuff for post holes, mortar repairs to a small area, brick laying (chooks would love to see me lay bricks) or any other small project.
biggrin

The only restriction would be that if you use a larger drum it may not be able to be stood up when you reach your destination coz it would be too heavy and you could knacker yourself.

Also, the drum needs to be able to squeeze through your gateway/door.
rolleyes

And, look, not a cat in sight biggrin

Live long and prosper

Doc wink